In July of 2024, I posted I added a Stratum 1 NTP server to my homelab to reddit. According to that posts analytics, it got 151K total views, 445 total shares and 354 magical internet points, now that’s pretty damn awesome. I hope that the post inspired others to also create their own NTP servers for their own homelab!
While yes, it was posted awhile ago, I thought I’d do a nice write-up on why I did it, what I did and how it’s going.
Why do you need your own NTP server?
I think the real question is, why don’t you already have one?! Haha but really, it’s just because why not. This was a super neat project to take on and I learned a lot. It really helped that I learned about the NTP protocol a little bit prior to actually starting the project so I could at least understand what I was doing.
A video that really helped me here was Network Time Protocol (NTP) by Computerphile. They talk about the structure of an NTP packet, how clients communicate to NTP servers and a little bit about the protocol history. If you’ve never seen it before, I highly recommend giving it a watch.
Stratum Levels
There are 16 stratum levels, 0 through 15, 16 is used to indicate that something is not synchronized. I’ll talk briefly about the first 4 Stratum levels but I think after the first two it’s pretty self-explanatory.
Stratum 0
This is your very precise time device such as an atomic clock, gps clock or some other radio clock. Examples of this include NIST-F1, the USNO Master Clock and GPS Satellites.
Stratum 1
These devices are syncing their time from a Stratum 0 source. Stratum 1 servers can be defined as devices not directly linked via network path to a reliable source of time. The key here is “not directly connected via network path”, if you are connected to a NTP server over a network, you cannot and never will be Stratum 1, you’re Stratum 2..3..4..5..6..etc..etc.
Stratum 2
While Stratum 0 and 1 are the best, Stratum 2 servers are still very reliable sources of time. More than likely the device you’re reading this off of is connected to a Stratum 2 server. If you’re on an Apple device you would be connected to time.apple.com, if you’re on a Windows machine you’re connected to time.windows.com, or maybe you’re synced to the NTP Pool Project which does contain Stratum 2 sources.
Stratum 3 or greater
Stratum 0 contains your atomic clocks, Stratum 1 are devices connected to those clocks not by a network connection, Stratum 2 is synced to Stratum 1 so Stratum 3 would be synced to Stratum 2. Your device is most likely a Stratum 3 or greater device. You could be a Stratum 10 or a Stratum 15 and as I’m sure you’ve started to figure out that means you could be 10 or 15 hops away from a Stratum 0 (atomic clock).
One thing to remember is that the higher the Stratum number the less accurate your time is in reference to an atomic clock. If you’re at Stratum 4 for example, there are three hops of devices in front of you before you get the time. While you’re not going to be off my tens of seconds, you’re not going to be accurate down to the nanosecond either.
Achieving Stratum 1
As much as I would love to have an atomic clock in my house that isn’t the case. At home you can achieve Stratum 1 by syncing with GPS Satellites!
I have a couple old Raspberry Pi 3B’s and I haven’t found a use for all of them but one of them is acting as my NTP server.
| Model | Raspberry Pi 3B |
| CPU | Broadcom BCM2837 / 4-core @ 1.2Ghz |
| Memory | 1GB LPDDR2 |
| Network | 100Mbps |
Since I had the Pi, I now needed to find a good GPS hat to throw on-top. After some research I landed on a GT-U7 GPS Module, I did go with the three pack in case I messed up the first time I had some extras. You’re probably wondering, “in case you messed up? what do you mean?”… well this module in particular requires soldering to connect the pins to the hat.
I have very little experience soldering which became very apparent while doing this. I actually did mess up on one of them, where I had accidentally soldered two pins together which obviously caused the module not to work right. The problem for me was that it was such little solder I couldn’t get it off, I ended up just grabbing another one from the bag and trying again. I didn’t make that mistake a second time 😉
After I had the pins connected, I attached the hat to the Pi using some Dupont wires. The small brown antenna that comes with the GPS module is more than enough for testing but I do recommend getting a better antenna for “production” use. I went with this active GPS antenna I found on Amazon, so far so good!
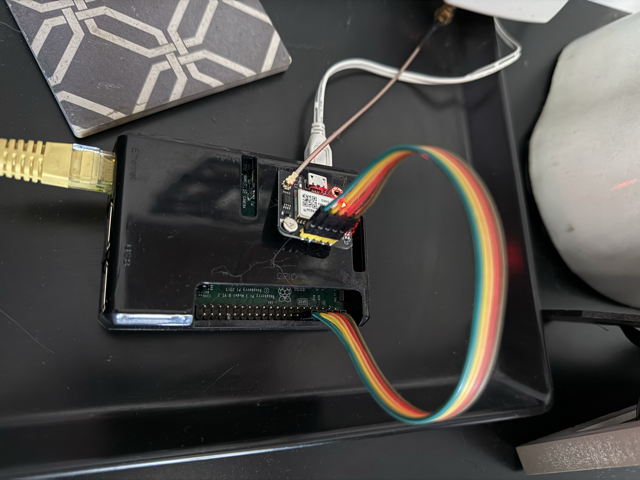 Pi with everything attached
At this point I started following the steps in this blog post by spookyghost. They walk through the software install, chrony configuration and tuning the clock.
Remember to set alternate “good” time servers in your chrony config just in case GPS goes out, you stay synced to at least another Stratum 1.
# Good Time Servers
server time.cloudflare.com iburst
server time.apple.com iburst
server time.nist.gov
server tick.usno.navy.mil
server tock.usno.navy.mil
Monitoring NTP
Since we’re using chrony we can monitor our NTP servers status by using Telegraf and then ship the data to InfluxDB to be displayed in Grafana! In this section I am assuming that you already run InfluxDB and Grafana.
Telegraf Install/Config
First things first, we need to install Telegraf on our Pi…
apt install telegraf
Now that we have Telegraf installed, we need to configure it. I use three different files in my /etc/telegraf/telegraf.d folder for this. Remember to edit the configuration examples as needed for your lab!
chrony.conf
# Get standard chrony metrics, requires chronyc executable.
[[inputs.chrony]]
outputs.conf
# Configuration for sending metrics to InfluxDB 2.0
[[outputs.influxdb_v2]]
  urls = ["https://influxv2.mydomain.com"]
  token = "HLzHahghdfu2348uy238ihrkjwbhflakuhsfkujshdfkjhKJHKJH8qIUlezoxl7Yt7vdj7BAPNmTw=="
  organization = "homelab"
  bucket = "chrony"
system.conf
# Read metrics about system load & uptime
[[inputs.system]]
Once we have those three files, we can restart our Telegraf service to start sending data to InfluxDB.
systemctl restart telegraf
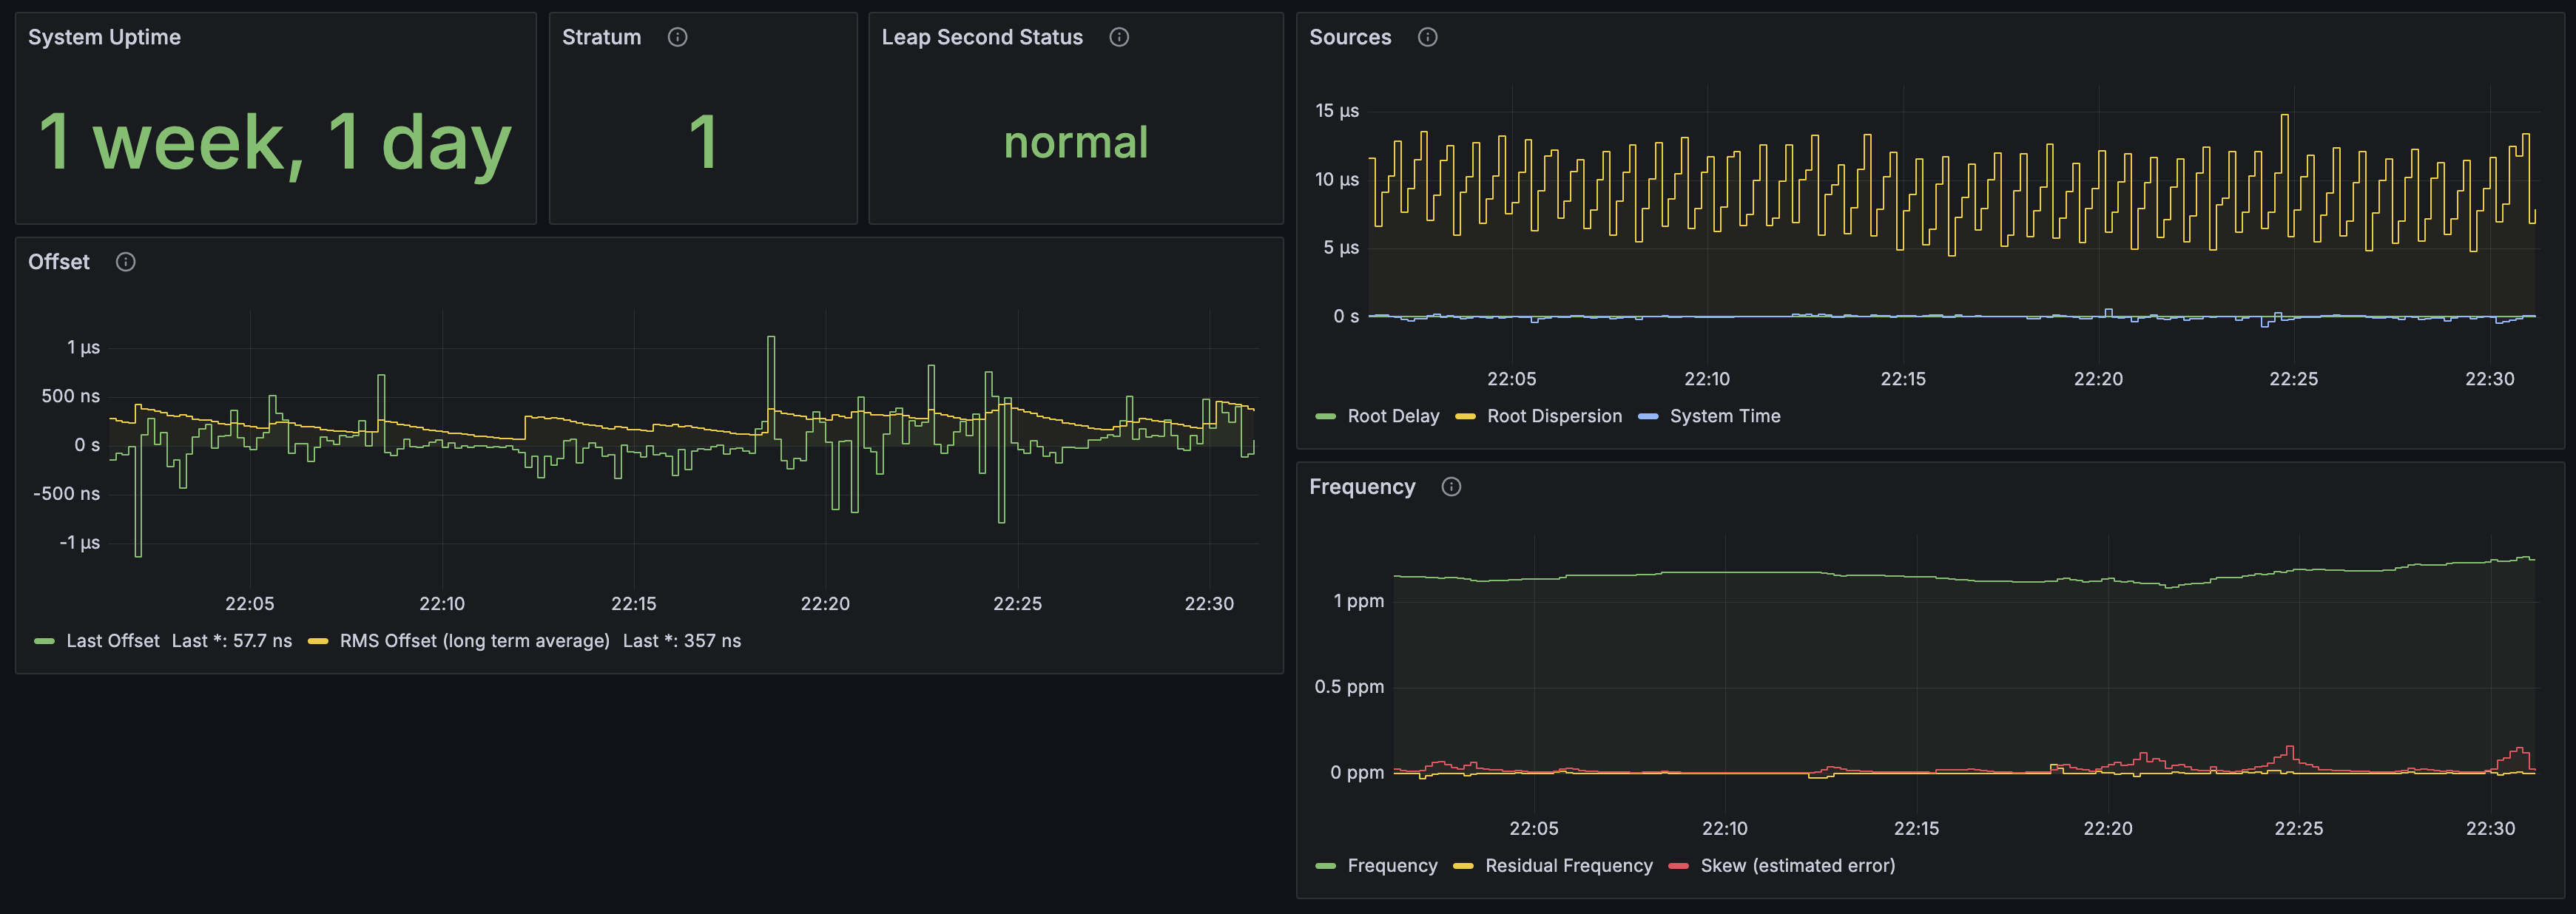
Grafana Dashboard
The cover photo all the way at the top is a screenshot from my Grafana dashboard which is monitoring my NTP server. I also have uploaded that same dashboard so you can use it as a base as well, you can check it out here.
While my dashboard isn’t the most complex and might not be the prettiest, it gets the job done. The most useful data on the dashboard is the offset graph, this will tell you how far off your clock is the Stratum 0 source.

Looking at my graph above, I average an offset of under 1 microsecond, sometimes it spikes up but that is still super accurate time. Imagine that 1 second is the time it takes to travel across the United States which is about 3,000 miles, if that is the case then 1 microsecond is like walking 3 feet. So it’s pretty damn accurate!
Using your NTP server
We have setup our hardware, configured the software and now have a Grafana dashboard. We now need to put this NTP server to use!
In my lab I run a Technitium DNS Server and this can also function as a DHCP server. I issue DHCP for my LAN and Wireless clients from this server so I have configured Option 42 on my scopes which is used for advertising NTP servers to clients.

After your clients refresh their leases, they should take this NTP server configuration. Now, not all clients will take this but most servers and desktops will. For example, the iPhones and iPads on my network don’t accept this option but the Windows desktops, MacBooks and Linux servers do.
Hopefully this post inspires you to run your own NTP server in your lab. It’s low maintenance and is especially great to have for automation purposes like Home Assistance wink wink.